
Painting a bedroom doesn’t require professional skills, just the right preparation and techniques. Many homeowners successfully refresh their bedrooms with a bit of guidance, turning a simple project into a rewarding weekend task. Bedroom painting is an affordable way to update your space, boost its feel, and even improve property value. This guide covers everything from tools and preparation to step-by-step bedroom painting steps and pro tips. Most bedrooms can be painted in a weekend or two, making it an achievable, satisfying project.
Tools & Materials You’ll Need
Gathering Your Painting Arsenal
Essential tools include a paint roller and frame, an angled brush, a paint tray, painter’s tape, drop cloths, and a ladder. Optional tools like an extension pole, paint stick, fine-grit sandpaper, and a putty knife make the process smoother. You’ll also need primer (if required), two coats of paint, and water for rinsing. Protective gear, such as gloves, old clothes, eye protection, and a mask,k keeps you safe. Quality tools save time and improve results, while buying a bit more paint ensures you have enough for touch-ups. Good tools don’t need to be expensive; they just need to make a noticeable difference.
Step 1: Prepare Your Bedroom
Setting Up for Success
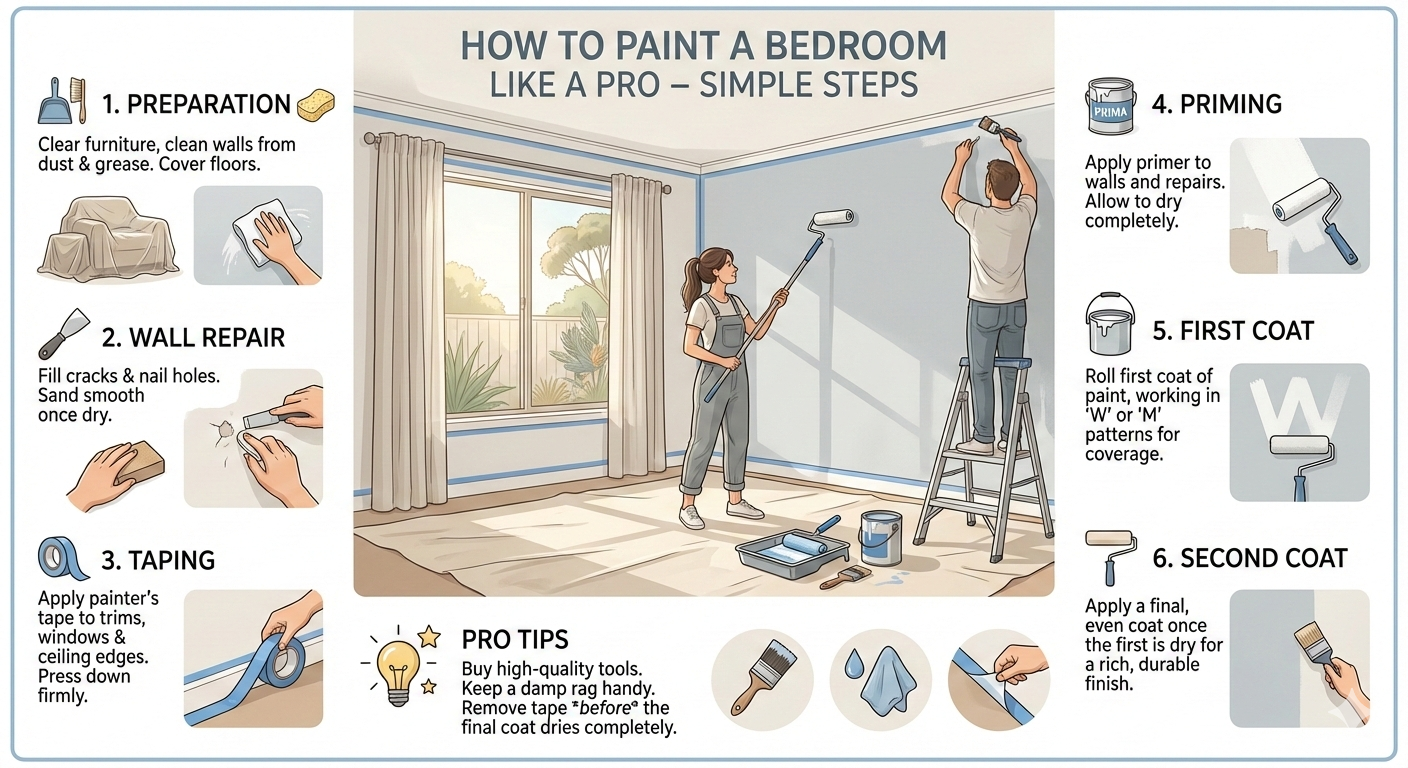
Before you even pick up a brush, preparing your bedroom properly sets the stage for a smooth painting job. It’s the same approach interior painting experts use to achieve clean, professional results. Start by clearing as much furniture as possible from the room. Any remaining items should be grouped in the centre and covered with plastic sheeting to protect them from dust and paint splatters.
Next, protect your floors by laying fabric drop cloths across the entire surface. Fabric is safer than plastic because it prevents slipping and absorbs drips. Cover light switches, outlet covers, ceiling fixtures, and air vents with painter’s tape or plastic bags to avoid accidental paint marks. Remove blinds, curtains, and any wall hangings to ensure unrestricted access to all surfaces.
Open windows and doors to provide good ventilation, keeping the room fresh while painting.
Professional tip: “Thorough preparation prevents paint drips and mess, saves cleanup time.”
Taking the time to set up correctly may take 30–60 minutes, but it saves hours of frustration later and ensures your bedroom painting process is efficient and enjoyable.
Step 2: Repair & Clean Walls
Creating a Smooth Canvas
Once your bedroom is prepared, it’s time to focus on the walls. Begin by carefully inspecting every surface for holes, cracks, dents, or imperfections. Small holes and dents can be filled with a lightweight spackling compound using a putty knife, smoothing it flush with the wall. Follow the manufacturer’s drying instructions to ensure the repair sets properly.
After the spackling has dried, lightly sand the repaired areas with fine-grit (220-grit) sandpaper for a seamless finish. Wipe down the walls with a damp cloth to remove dust, sanding residue, or debris. If walls are particularly dusty or grimy, a light wash with mild soap and water is recommended; just make sure the surfaces are completely dry before painting.
Professional insight: “Wall preparation determines paint adhesion and final appearance; don’t skip this step.” For textured ceilings, simply use a damp cloth to avoid disturbing the surface texture while cleaning.
Step 3: Tape & Protect
Achieving Clean Lines
With walls prepped, it’s time to protect edges and trim. Apply quality painter’s tape along ceiling edges, window frames, door frames, baseboards, and any other trim. Press the tape firmly to prevent paint from seeping underneath, and use a putty knife to secure it along the edge for a crisp line. For textured ceilings, lightly score along the edges with a screwdriver before taping to improve adhesion. You don’t need to tape every inch; focus on the trim and major edges. Professional tip: “Quality painter’s tape prevents bleeding and cleanup headaches.” Once painting is complete, remove the tape while the paint is still slightly tacky for a clean, sharp finish.
Step 4: Prime (if needed)
When & How to Prime
Priming sets the stage for a smooth, even finish. Apply primer when working with new drywall, covering dark paint with a lighter colour, making a significant colour change, or dealing with stains. If repainting the same or similar colour on sound walls, you can skip this step. Use an angled brush to cut in along ceilings, corners, and trim, roughly 2-3 inches from the edge. Then, roll the primer onto the walls in a W- or M-pattern, working top to bottom, keeping a wet edge to blend sections seamlessly. Allow the primer to dry according to the manufacturer’s instructions, typically 1-4 hours. Professional note: “Good primer saves paint and ensures even coverage.”
Step 5: Paint – First Coat
Applying Your Colour
Now that your bedroom is prepped and primed, it’s time to apply the first coat. Stir your paint thoroughly with a paint stick for 1–2 minutes to ensure even colour. Pour paint into a tray, avoiding filling to the brim to reduce spills. Start by cutting in with an angled brush along the ceiling, corners, and trim, about 2–3 inches from the edge. This step is essential in any DIY bedroom painting project.
Next, use a roller loaded with paint and roll over the tray’s ridged area to remove excess paint. Apply paint to the walls in a W- or M-pattern, working from top to bottom. Maintain consistent pressure and overlap slightly, keeping a wet edge so sections blend seamlessly. Remember, the first coat may appear patchy; this is normal.
Professional bedroom painting tips: “The first coat primes the surface; the second coat brings the true colour and smooth finish.” Following these steps for painting bedroom walls is the best way to paint them efficiently.
Step 6: Paint – Second Coat
Achieving Professional Coverage
After the first coat has dried for 2–4 hours (as indicated on the paint label), stir the paint thoroughly again. Repeat the same process: cut in along the ceiling, trim the corners, then roll the walls in a W- or M-pattern, working top to bottom. Pay close attention to coverage, ensuring the entire wall is even, and add paint to any thin spots. Keep a wet edge for a seamless finish. Allow the final coat to dry completely, usually 4–24 hours depending on the paint type.
Professional bedroom painter tip: “The second coat provides complete, even coverage, though some bold or dark colours may need three coats.” Following these bedroom painting steps helps you paint a bedroom like a pro efficiently.
Pro Tips for Success
Insider Tricks for Professional Results
When learning how to paint a bedroom, small details make a big difference. Don’t overload your roller; excess paint causes drips. Feather edges by using light pressure at corners and trims. Keep brushes fresh by cleaning between sections or storing them in a plastic bag. Maintain consistent roller pressure to avoid lines or marks, and work methodically, finishing one wall before moving to the next. Use an extension pole for ceilings or high walls, and keep a damp rag handy to wipe drips immediately.
Professional bedroom painter tip: “These small tricks separate average results from professional-quality finishes.” Following these bedroom painting steps ensures you paint a bedroom like a pro efficiently, making your DIY bedroom painting experience smooth and stress-free.
Frequently Asked Questions
Can I paint directly over wallpaper?
It’s not recommended. Remove wallpaper first for proper paint adhesion. Painting over it may cause bubbling or peeling.
How many coats do I need?
Most walls need two coats. Dark or bold colours require 3 for full, even coverage.
Ceiling or walls first?
Always paint the ceiling first to prevent drips on freshly painted walls.
When can I sleep in the room?
Paint is touch-dry in 2–4 hours, but wait 24 hours for full curing.
Can I finish a bedroom in one day?
One coat may be possible, but two coats with drying takes 2+ days to achieve a professional finish.
When to Call a Professional
Know Your Limits
DIY bedroom painting works well for standard walls in good condition. However, if your room has high ceilings, intricate trim, textured walls, or needs significant repairs, hiring a professional painter is wise. Experts deliver faster, flawless results and manage tricky situations efficiently. For busy homeowners, the time saved by hiring a pro is invaluable, ensuring a smooth, stress-free finish every time.
Cleanup & Finishing
Leaving No Mess Behind
For a professional finish, remove painter’s tape while the paint is still slightly tacky to ensure clean lines. Clean brushes and rollers immediately with water for latex paints and suitable solvents for oil-based paints. Seal leftover paint in labelled containers for future touch-ups. Wipe any spills straight away, and carefully remove drop cloths to avoid spreading dirt. Dispose of materials responsibly. Allow your interior bedroom paint to cure for 24–48 hours before moving furniture back. Proper cleanup respects your space and prolongs the life of your tools.
Conclusion – Your Bedroom Awaits
Painting a bedroom is completely achievable for most homeowners with the right preparation and approach. The key to success is thorough preparation for bedroom painting, quality tools, patience, and careful following of each step. While the steps are straightforward, attention to detail ensures the best results. A fresh coat of interior bedroom paint can transform your space affordably and quickly. Small mistakes are normal and improve with practice. If DIY feels daunting, professional guidance is always available. Whether you go DIY or call in the experts, your freshly painted bedroom will feel fantastic.